The EZ setup has at least one EZ Updater machine and one or more EZ Clients. We start with the EZ Updater installation first. After that, we configure the EZ Updater, so the EZ Client builds are available to client machines. Once the client machines have installed EZ Client (and Zoom Client), the EZ system is ready to go auto-pilot!
Check that the prerequisites for EZ are fulfilled before proceeding further.
Step 1: Install EZ Updater
Access your support account for Evolphin support team’s email and download the EZ Updater for Windows or Linux as needed. These are the steps for installing it on Linux and Windows respectively:
EZ Updater for Linux
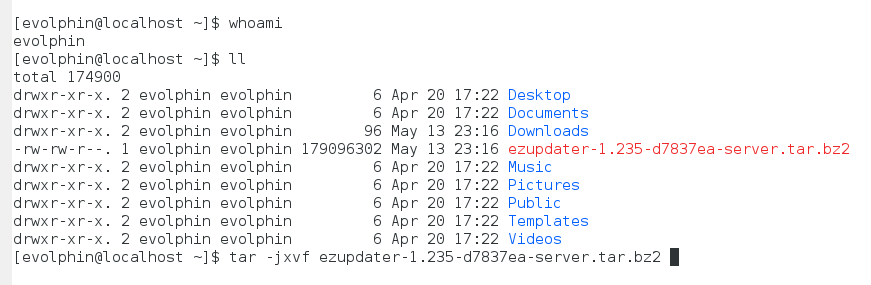
- Download the relevant setup (*.tar.bz2) file and save it locally, preferably at the home directory with the owner as “evolphin”. The user evolphin should be a non-sudo user.
- Extract the ezupdater-*-server.tar.bz2 file using the command below (* is the version).
tar -jxvf ezupdater-*-server.tar.bz2
The path where the ezupdater setup is extracted will also be used to install Zoom. A new folder named as ezupdater will be created in the same location as shown above.
- Change permission of /home/evolphin/ezupdater/bin/ezupdater to 755 so that anyone can execute it.
- Create EZ Updater service by copying the script from /home/evolphin/ezupdater/bin/ezupdater_init.d.sh to /etc/init.d/ezupdater
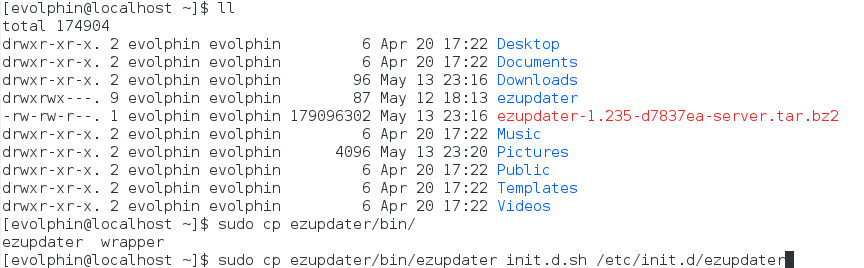 In order to copy scripts to /etc/init.d folder, the user needs root permission.
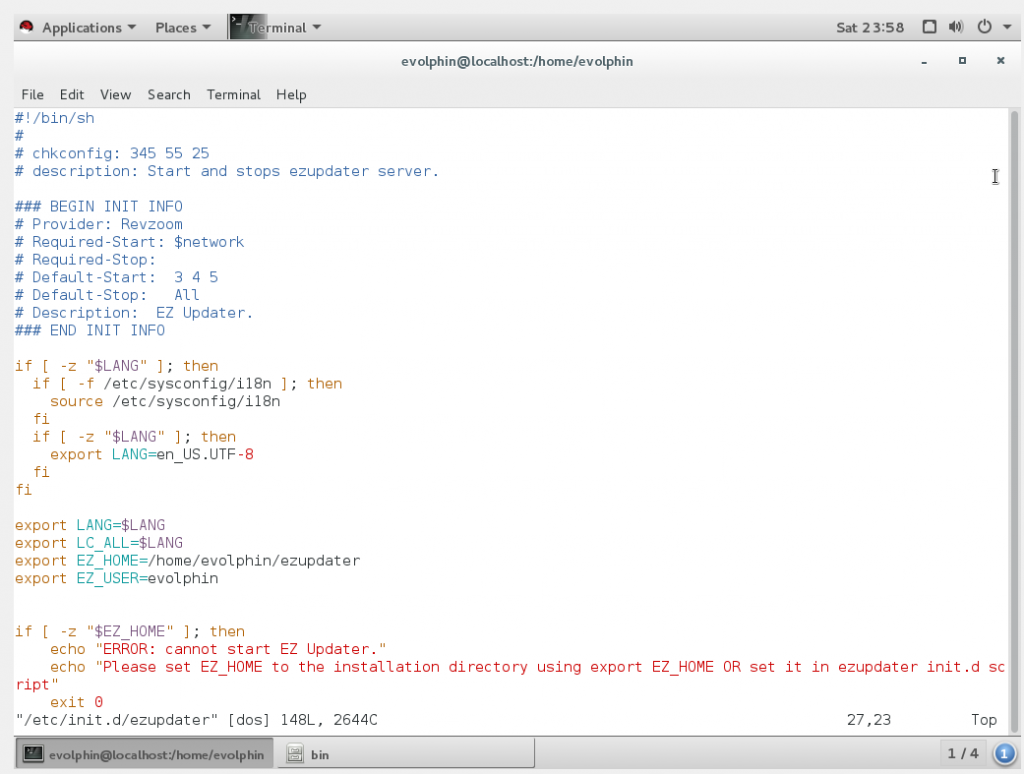
 - Open /etc/init.d/ezupdater in any text editor and change the values of the variables EZ_HOME and EZ_USER.
EZ_HOME is the installation directory. By default, it is set to /home.evolphin/ezupdater and it is used for installation.EZ_USER is the authorized user. By default, it is set to evolphin user and is used for installation.
- Change the permission of file /etc/init.d/ezupdater to 755
Changing permission and making sure EZ_HOME and EZ_USER are populated by a proper non-sudo user is necessary.
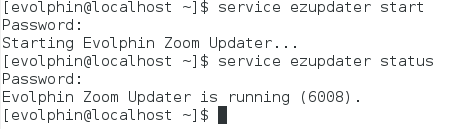
- Start the services with the user evolphin
/etc/init.d/ezupdater start OR service ezupdater start
- Check the status
/etc/init.d/ezupdater status OR service ezupdater status
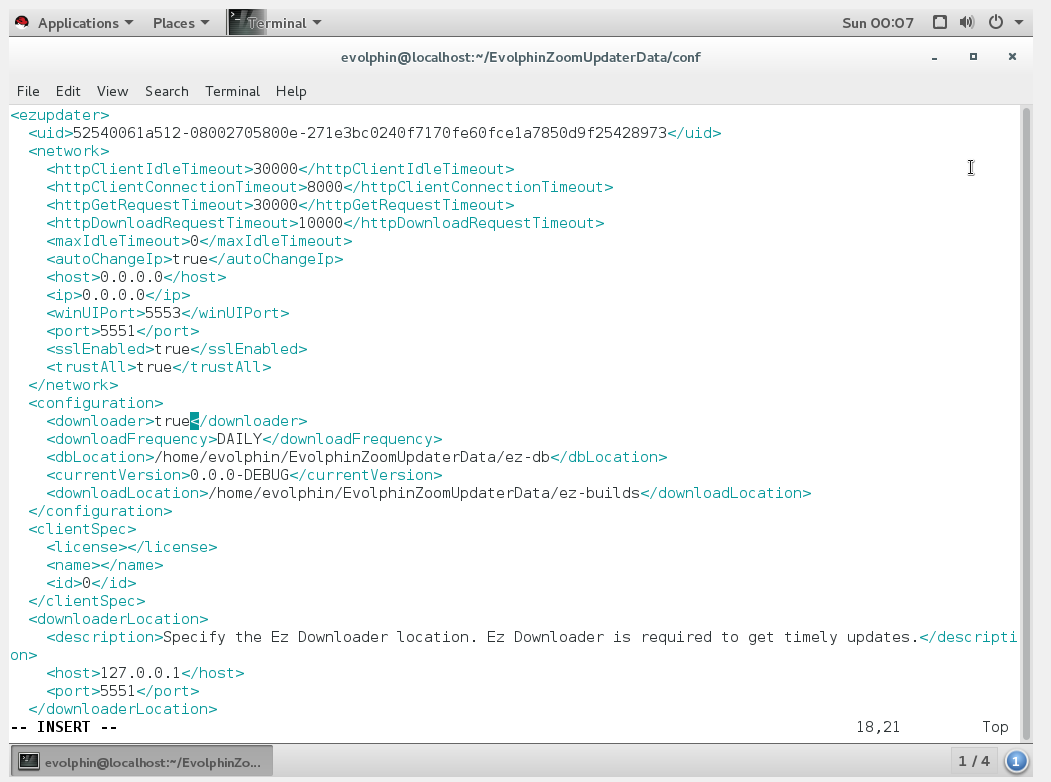
- Open [InstallationPath]\EvolphinZoomUpdaterData\conf\ez-updater.xml and change the value of <downloader> tag under <configuration> to true.
The default port configured for EZ service is 5551. If you wish to use another port, then update the value of the <port> tag under <network> to the free port reserved for use with EZ on your EZ Updater machine.

- Restart the ezupdater service.
- Check if the EvolphinZoomUpdaterData folder is created ([InstallationPath]/EvolphinZoomUpdaterData). The installation is successful. EvolphinZoomUpdaterData is the folder which contains all the configuration files, all the logs, and all the backup files.

EZ Updater for Windows
- Download the relevant setup (*.msi) file and save it locally.
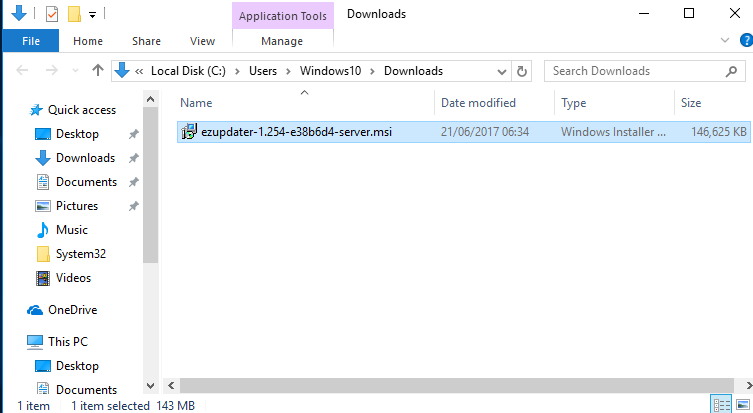
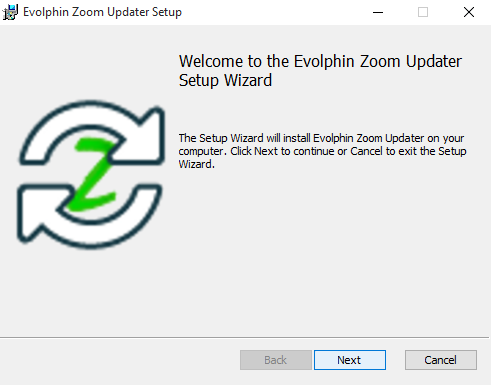
- Execute the msi file.
- Follow the on-screen instructions to install EZ Updater.
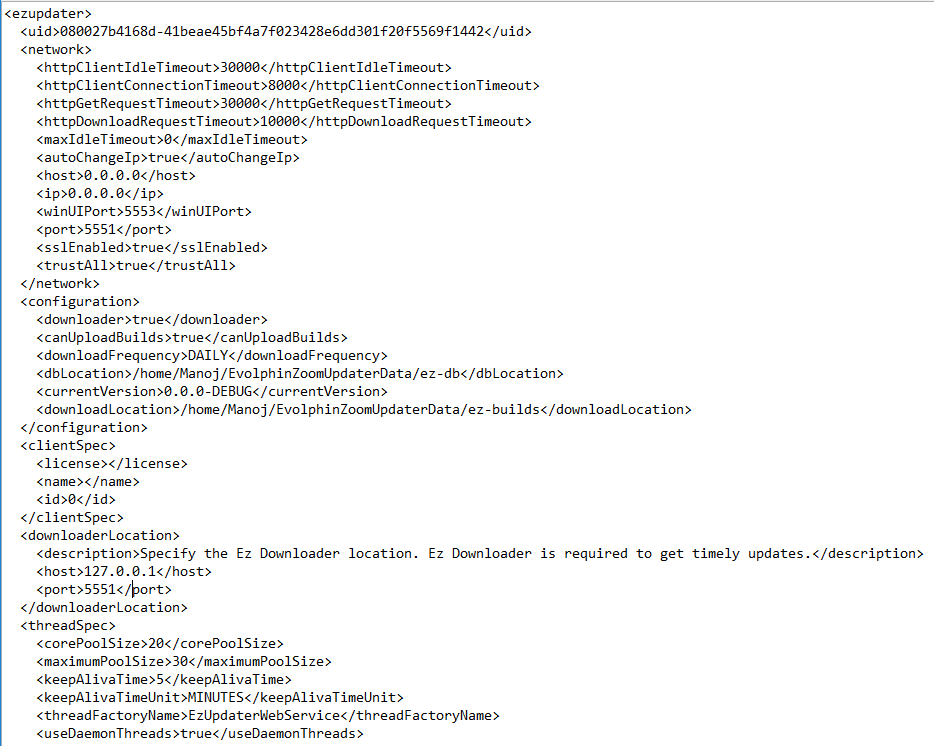
- Open C:\Windows\System32\config\systemprofile\AppData\Roaming\EvolphinZoomUpdaterData\conf\ez-updater.xml and change the value of <downloader> tag under <configuration> to true.
The default port configured for EZ service is 5551. If you wish to use another port, then update the value of the <port> tag under <network> to the free port reserved for use with EZ on your EZ Updater machine.
- Restart the Evolphin Zoom Updater service.
- Check if the EvolphinZoomUpdaterData folder is created (C:\Windows\System32\config\systemprofile\AppData\Roaming\EvolphinZoomUpdaterData). EvolphinZoomUpdaterData is the folder that contains all the configuration files, all the logs, and all the backup files.
Step 2: Configure EZ Updater
After installation, the Evolphin Zoom Updater login page should open up. If it does not open, then manually open this link: https://localhost:5551. For the first run, we have to register an EZ Admin account on this EZ Web portal.
EZ Admin account registration
You need atleast one EZ Admin account to manage the EZ setup.
Setting up EZ Updater
After registering an EZ Admin, move on to setting up the EZ Updater.
Step 3: Prepare and send the link for EZ Client installation
After the configuration in the last step, the EZ Updater will automatically start downloading the available Zoom builds from the Evolphin Server as scheduled.
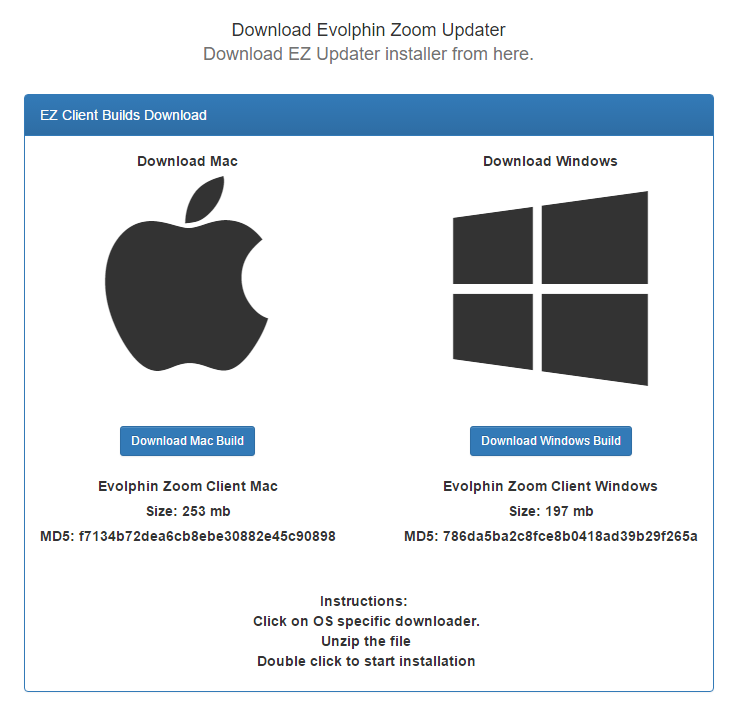
In the meantime, set up the EZ Client machines. Access your support account or Evolphin support team’s email to download the EZ Updater Clients for Windows and Mac as needed (this is the same location from where you had downloaded the EZ Updater setup).
Step 4: Install EZ Client
The last step in setting up EZ is to install it on the EZ Client machines (that will host Zoom Client). The build is shared by your EZ Admin after EZ Updater has been set up.
On the client machine, download your OS-specific build from the link shared by your EZ Admin. The link will point to the EZ Updater machine and should look like this: https://[EZUpdaterIP]:[EZPort]/client/download.html (for e.g. https://192.168.0.17:5551/client/download.html).
For first time Zoom set up on Windows clients, user needs to manually install Zoom Client either before or after installing the EZ Client. Zoom Updater Service would keep it up-to-date after that.
Follow these steps to install EZ Assistant for Windows or macOS:
- Download your OS-specific build from https://[EZUpdaterIP]:[EZPort]/client/download.html (for e.g. https://192.168.0.17:5551/client/download.html). This link is shared by the EZ Admin. The zip files are mac_ez_client.zip and win_ez_client.zip for each OS.
- Extract the zip file you need.
For Mac
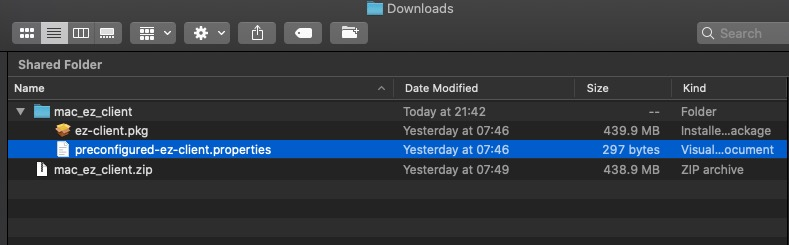
- Check the extracted files.
- Locate the ez-client.pkg file in the extracted files. Sometimes, Safari can automatically extract the ZIP upon download.
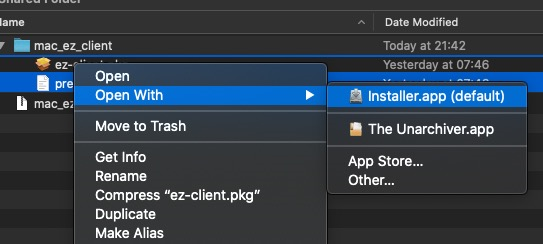
- Right-click the ez-client.pkg file in the Finder and select Open With -> Installer.app
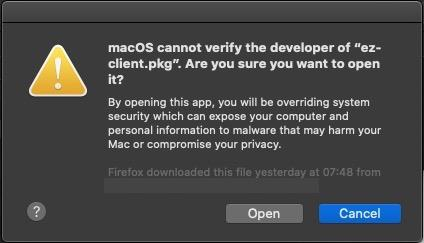
- A warning prompt might appear, informing about the installer. Click Open to start installing.
- Follow the on-screen instructions.
- During the installation, Installer.app might ask for permission to access the Downloads folder. Click OK to allow it to access the Downloads folder.
If you deny permission to access the Downloads folder, then you would need to re-install the application again after unblocking the Installer app from Mac Security and Privacy settings. Click here for details.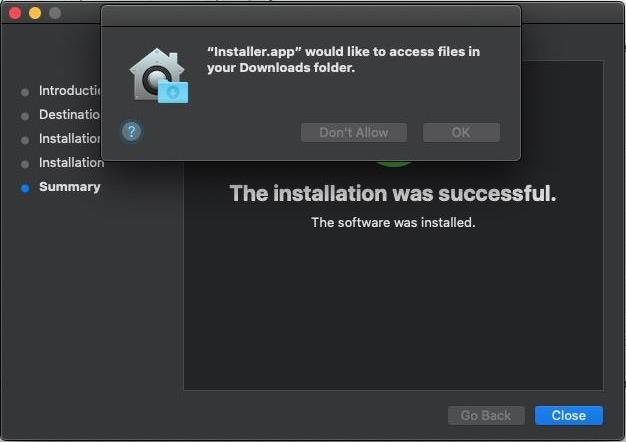
- The installation proceeds after allowing access to the Downloads folder.
- Once the EZ Client is installed, it will start by searching for an update to the Zoom Client on this machine.
- If a Zoom Client update is available, a prompt is shown to install it.
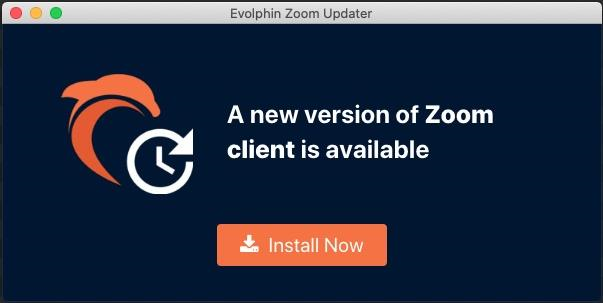
- Click Install Now to begin Zoom Client upgrade/installation.
- The EZ Client runs the Evolphin Zoom Updater service to check and notify of Zoom Client updates at the frequency set by your EZ Admin.
For Windows
- As stated at the beginning, if you are installing EZ Client on a Windows machine that does not already have Zoom Client, then you need to install Zoom Client manually. The Zoom Client can be installed before or after the EZ Client.
- Check the extracted files.
- Locate the EZ installer, ez-client.msi file, in the extracted files.

- Double-click the ez-client.msi file to begin the installation of EZ Client.
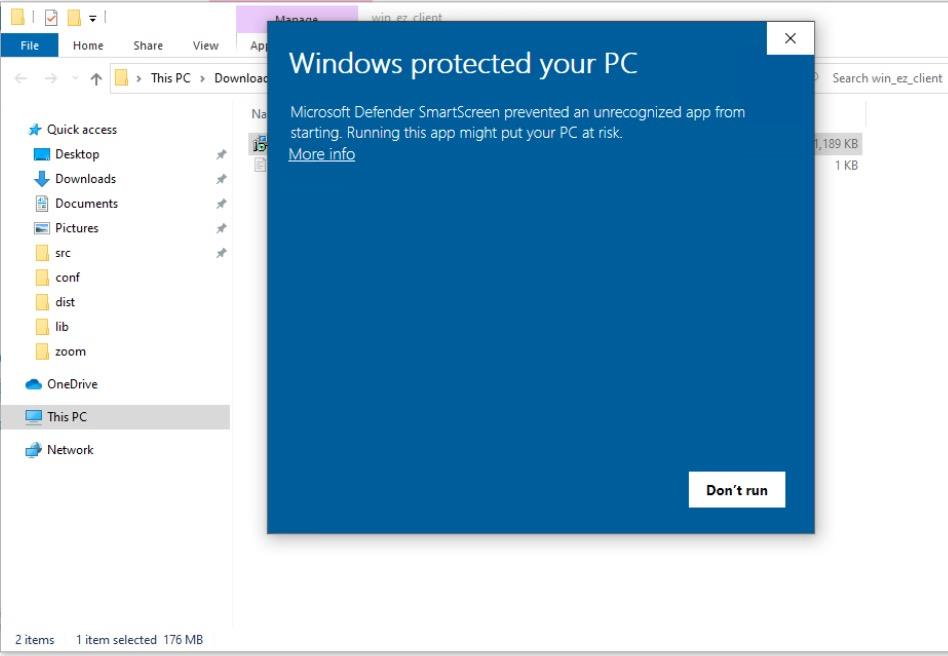
- A warning prompt might appear, informing about the installer. Click More Info and then click Run anyway to start installing.
- The installation starts. Follow the on-screen instructions to finish the installation.
- Install the Zoom Client if it was not installed before.
- Once the EZ Client is installed, it will start by searching for an update to the Zoom Client on this machine.
- If a Zoom Client update is available, a prompt is shown to install it.
- Click Install Now to begin Zoom Client upgrade/installation.
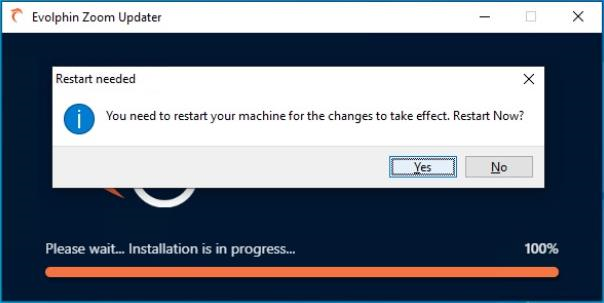
- After Zoom Client is upgraded, EZ will prompt to restart. Click Yes to restart your computer.
- The latest available Zoom Client is now installed on the Client machine.
- The EZ Client runs the Evolphin Zoom Updater service to check and notify of Zoom Client updates at the frequency set by your EZ Admin.
The EZ Client now is ready. EZ Assistant is the application for accessing EZ Updater features on the EZ Client machines.
After installation, the EZ Assistant will start automatically and run the Evolphin Zoom Updater service to check for the latest available Zoom Client builds.
EZ is now ready to monitor and install Zoom Client builds as made available my your EZ Admin. Check EZ Client page to know about how EZ Assistant automates this.