In Zoom parlance, a job is an entire workflow comprising of individual work components called tasks. A job is tied to a specific project and comprises of one or more tasks. Each task has one or more owners and has a specific set of assets to work upon. The set of assets could be assigned statically during task definition or be resolved dynamically based on some rules you would define at the time of task creation.
As shown in an earlier section, the workflow manager can be invoked from within the web-based administration console by clicking on the “Manage Workflow” in the left side navigation panel. This will bring up the list of jobs currently defined, and also the design space where new jobs or job-templates could be created.
From Zoom 5.5 onwards, the Workflow module is available on HADR deployments as well.
How to create a job
You can create a new job (or a job-template), by clicking on the ‘+’ icon at the bottom bar. You will see two pre-defined tasks namely “Start” and “End” representing the logical beginning and end of a job. On the right side panel, you will see an array of various kinds of tasks. You can drag and drop one or more of these into the center panel and connect the tasks in a logical sequence to create the complete job.

In the “Start” task node or in the “Job Info” form define the project, start date, workflow type, comments for the entire job.
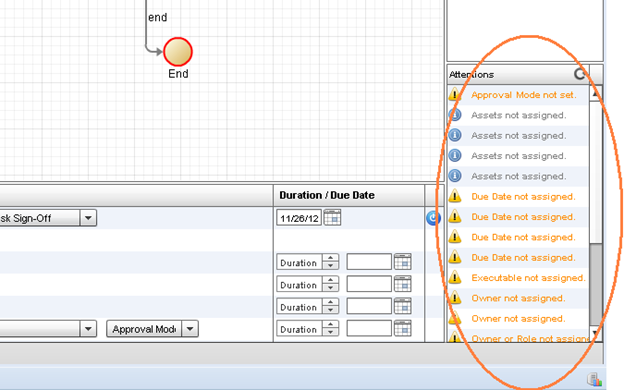
You must define the owners, assets and the due dates for each of the tasks you add to the job. Note that on the right side there is a panel titled “Attentions”; this lists all the issues/errors that have to be fixed before the job definition is complete and can be saved.Warnings can be ignored but errors must be fixed.
You can also save any workflow design as templates by clicking the top right-most save button. Please check the tool-tips to identify the desired operation. Parameters inside the job can be preserved or saved inside a template. These will be used as default values when a job is created from the template. Currently, following parameters are available to be saved in a template:
- Due Dates
- Task Owners
- Assets assigned from Repository or from a Template Folder structure on the server

Once saved as a template, you could create jobs out of them by clicking on the ‘+’ icon next to the template listed as shown below:

You can also filter the job listing based on the status of the job using the “Show: “ drop-down list at the bottom bar. By default, this is set to “Show: All” listing the all the jobs defined.
Job Metadata
When you create a job you can fill-in the Job Info form with the values for standard Zoom job metadata. In addition, you can assign a number of custom job metadata fields to a job.
Standard Zoom Job Metadata
- Right click -> Edit Job Info on a selected job name in the Workflow Design tool:
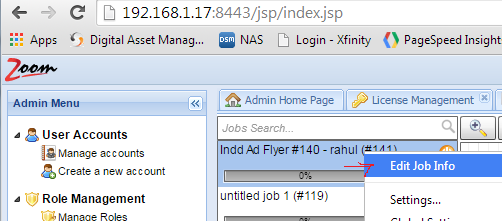

- Edit the metadata in the info panel. This will be used for reporting and will be visible in the task manager.
Custom Job Metadata
Click on the “Show Optional Metadata” to edit the custom metadata fields.
Please see this article for more details on editing custom job or task metadata fields.
Job Deletion
You can delete a job from the workflow designer by clicking on the ‘-‘ icon at the bottom bar. When a job is deleted, all its component tasks are also deleted.
Task Sign-off Policies
When a task is completed and signed off, the workflow moves forward to the logical next task/set of tasks. This automatic transitioning is also reported through multiple channels to all parties involved. Such automation coupled with adequate notification mechanisms will help the managers and task owners track the work progress more effectively.
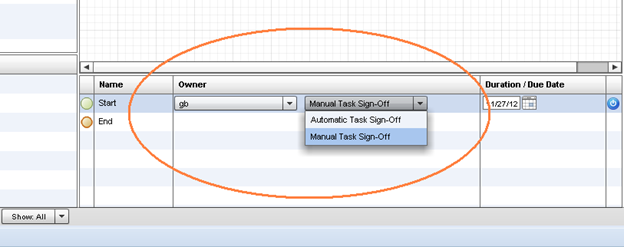
The workflow may be set to either manual-mode or auto-mode. In the auto-mode, if a particular task is detected as completed, the task will automatically be signed off and the workflow will transition to the next stage. In the manual mode, even if the task is complete, the transitioning to the next stage will only happen if the owner explicitly signs off.
The task modes can be chosen from the drop-down list next to the “Start” task in the workflow designer panel as shown in the screenshot below:
Types of Tasks
Zoom supports three task types:
- the assignment task,
- the review task and
- the auto task.
The Assignment Task
The assignment task is typically a work item assigned to a single user. The task owner must sign into this task to start the task. He/she then works on the assets mapped to this task; new assets may also be added during execution of this task. Upon completion of the task, the owner signs off the task.
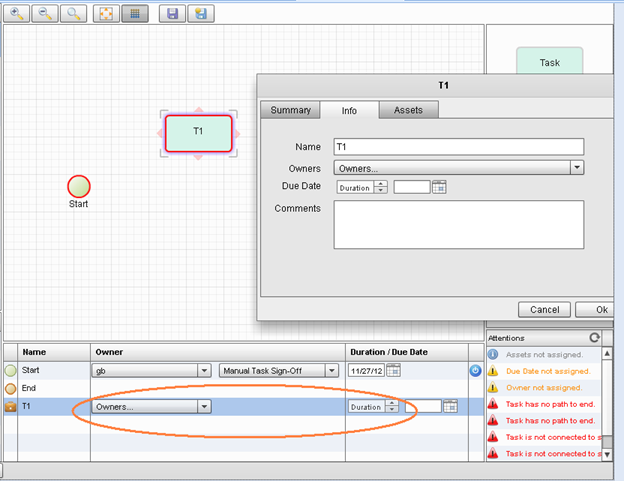
You can add an assignment task to your job by dragging the “Task” image and dropping it in the center panel. Double-clicking the task box will bring up an interface where you can set the details like duration/due date, and owners of the task. Alternately you could define these details using the interface at the bottom panel which lists all the tasks in the job. See screenshot below.
The Review Task
The review task is one where the work done in an earlier assignment task is inspected and reviewed. A review task is always tied to a specific assignment task. An assignment task can have more than one review task too. If there are multiple review tasks following an assignment task, they could either be sequentially launched one after the other or proceed simultaneously in parallel all at once. The job creator can decide how to stack the review tasks according to each organization/process/project concerned.
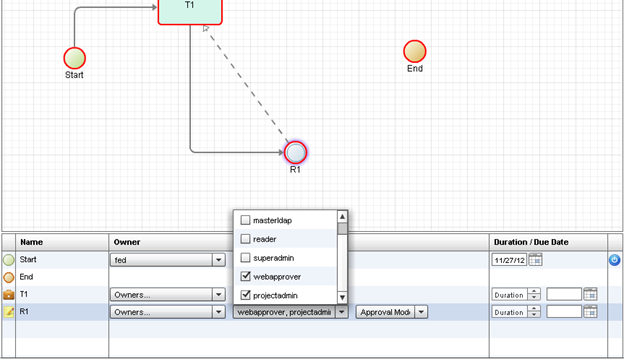
A review task can have one or more owners. You could define the owners by directly selecting them from the list of users as shown below.
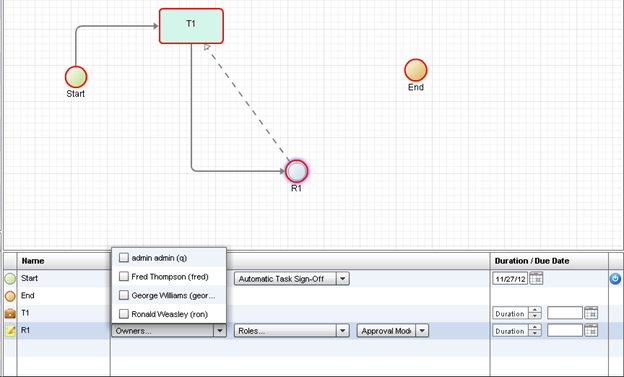
Alternately you could select one or more roles and map them to the task. This would mean that when the review task is ready to start, whichever users are mapped to the selected roles for the concerned project will become approvers of the review task.
Notice that for a review task, there are two paths mapped. In the screenshot above, the review task R1 follows the assignment task T1. This flow is indicated by the solid line. The dotted line which flows from R1 back to T1 indicates the rejection path. That is – if the reviewers (owners of R1) think that work done in T1 is not up to the mark, the task T1 will have to be repeated. There could be any number of iterations of T1->R1->T1 before the task is finally approved by the reviewers. Once the task is approved, R1 will proceed to the next task in the job.
Because there are multiple reviewers possible for a review task, we need to define an additional parameter called the “Approval Mode”.
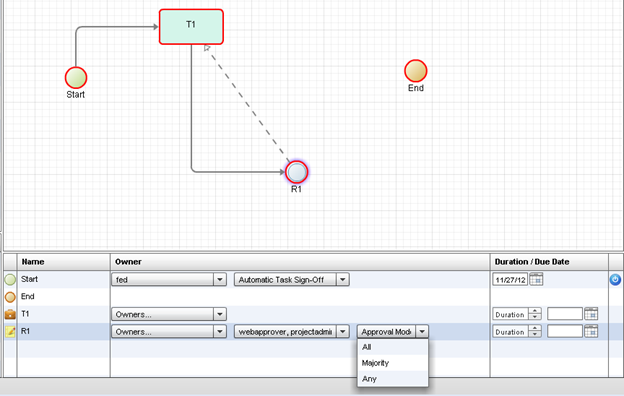
Using this criterion, you could design the review task such that it is deemed complete if “All” reviewers approve, “Majority” reviewers approve, or “Any” reviewer approves the task T1 (that is, assets of T1).
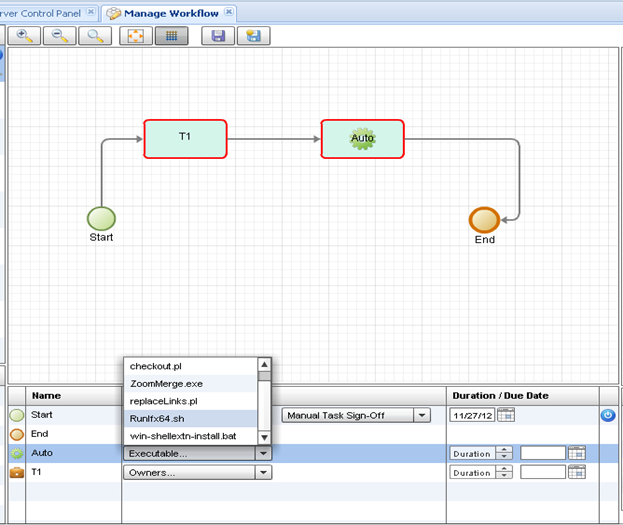
The Auto Task
You can have scripts or executable run automatically at specific steps in your workflow using the auto task widget.
In order to do that:
- Add the scripts or executable to the dedicated scripts folder on the Zoom server.
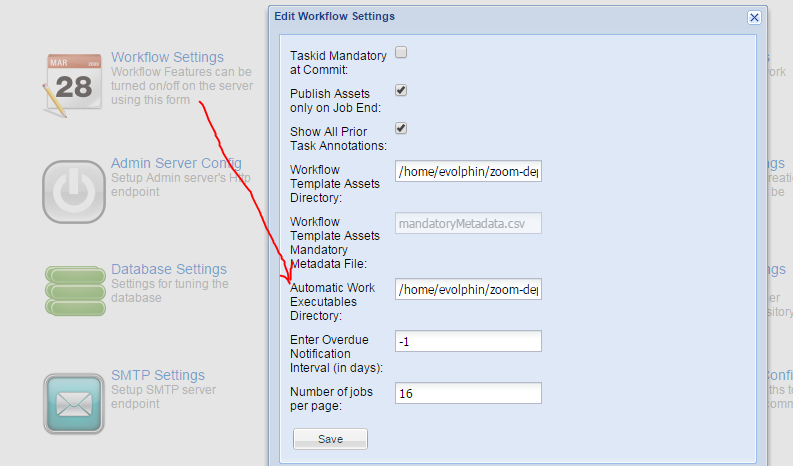
- Assign this scripts folder via the Server Control Panel’s Workflow Settings -> Automatic Work Executables Directory: On HADR deployments, the path specified for the scripts folder, and also the contents of that folder, must be identical on all HADR peers. Using a symbolic link to a common network-share directory is recommended.
- After you add the executables/scripts to the target directory defined in the settings, you can configure any of those to be run as an automatic task as part of a workflow. The selected executable will be run as soon as the Auto task becomes ready to start (that is, as soon as the previous task is completed).
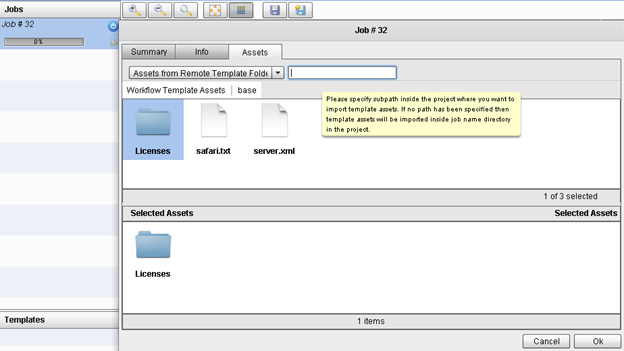
Template Assets
When you define the project (in Zoom) for a job, all the assets in the Zoom repository of that project are potentially available to be associated with the tasks in the job. In addition to these assets, you could also bring in a copy of pre-defined template assets. Typically these are templates or spec files based on which new assets will have to be developed.
The pre-defined templates are stored in the configured template directory on the Zoom server. Remember – the workflow template directory location can be set through the Workflow Settings interface within the Server Control Panel in the web-based admin console.
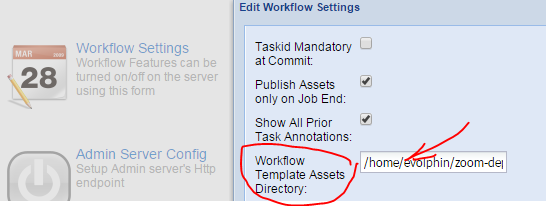
In the Job Assets panel, you can select one or more template folder with or without template/spec files. These folders will then be available to the tasks inside the job. The task assets can be then be selected from the template folders.
Task Assets Routing
There are several ways of associating or routing assets to a task. The association can be static where the assets are resolved at the time of task definition, or it can be dynamic where the assets are resolved when the task is ready to be started.
These are asset routing policies supported by Zoom:
Assets from Template
If the job has template folders associated with it, then the assets in the template folder become available for the tasks. When this option is selected, you can select one or more assets from the job’s template assets and map them to the task.
Assets from Repository
This is the most straightforward static association wherein the assets of the concerned Zoom project are simply picked out from the repository and mapped to the task.
Assets from Previous Task
This is a dynamic association wherein the assets from the previous task, are marked as assets for the current task. When the job is being created, these assets are not resolved. Once the job is saved and started, the assets are resolved and you can edit this task to choose which of the assets from the previous task you want to assign to the current task.
Alternately, you can also make available all the assets of the previous task to the current task by enabling the “Auto-assign all” checkbox. This does not require user intervention after the time of task definition.
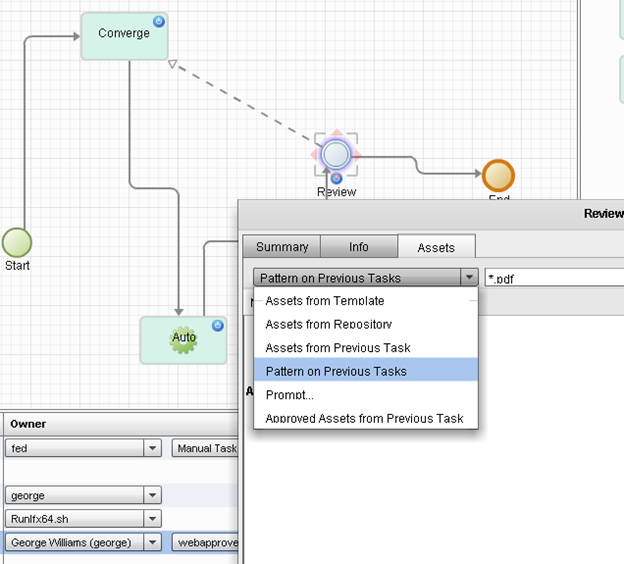
Assets Pattern on Previous Tasks
This again is another dynamic association wherein a pattern of files from the assets of the previous task is made available to the next. For example, you could choose to assign all *.pdf files from the previous tasks to the current task. This is very useful if the previous task generates lots of intermediate or design files, out of which only a subset of files needs to be moved forward to the next step in the process.
Prompt…
With this option, you can make a specific user select the assets for a task just prior to starting that task. This requires user intervention, wherein the selected user must log in to the Task Manager and pick out the assets for the upcoming task while the job is running.
Approved Assets from Previous Task
This option will bring in all the approved assets from the previous task to be mapped to the current task. Individual assets can be approved (or rejected) from Zoom’s Visual Approval tool which is described in a later section. This option is only available for those review tasks that are placed in tandem next to another review task – only a previous review task will have “approved assets” which can be made available to the current task.
Parallel Paths in a Job
A workflow need not be just a sequential execution of one task after another. You could define a job to contain parallel sub-paths in it wherein sets of tasks are executed simultaneously.
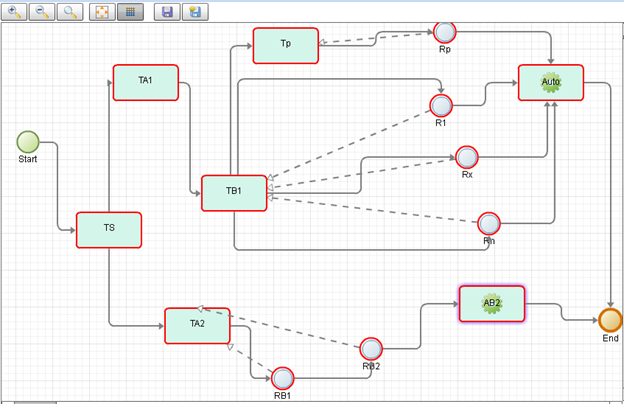
In this example shown above, the paths Tp->Rp, R1, Rx, Rn are all started simultaneously.
Editing Saved/Started Job/Task
It is possible to make changes to the job/task after it is created and saved. You could edit the required details from inside the web-based workflow designer and save the changes. These changes can then be pulled at the client’s end using the Task Manager’s (described in a later section) sync option.
The ability to be able to change the details of a task, like its due date or owner is very useful. More powerful than this aspect is the ability to change the course of a workflow either by changing the sequencing of the tasks or by adding or deleting tasks in the job. Thus you can modify the job on the fly, with the following restrictions:
- Don’t delete any task in between the start state and a task that is started/finished or pending review. In other words, operate on a task that is not started yet.
- Don’t change the task owner of a completed task
- Don’t delete any assets assigned to an assignment task that is started/finished or pending review.
- Don’t delete assets assigned to a review task in progress in the workflow
If the workflow job gets into a bad state, please delete the job and start a new one in its place.